How to Train Kites Together
Making a Kite Train
Pass the flying line through the center fitting of your kites. Space kites about 3 feet apart.
Using a small rubber band, larks head to flying line — just behind each kite, to keep the kites “in position” on the flying line.
If you wish to be able to hook the kites together in a train and then un-hook again for single line flying, you might want to try this:
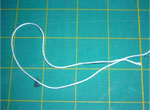
- Cut a 3½ foot length of line.
- Run this line through the center fitting of the kite.
- Tie a loop on each end of the line. Front and back of the kite.
- Tie another smaller loop at the end of each loop. This is called a “Pig-Tail”.
- Attach a small rubber band, using a larks head, just below the loop on the back of the kite. The rubber band now serves as a stop on the back side of the kite. If you do not attach a rubber band, tie a knot, large enough to keep the now ‘bridle’ line from pulling through the center fitting. To learn more about the larks head knot search the web “larks head knots kites”. There are good videos and pictures easily found.
- You can now larks head the loop on the front of the kite to either a flying line or to the back loop of another kite, making a train.
- Simply pull both of the pig tails to loosen your knot and detach from either a flying line or the back of another kite!